


Volkswagen ID.3: Electric drive. Power and control electronics for electric drive
- Removing and installing power and control electronics for electric drive at rear
- Removing and installing power and control electronics for electric drive, front
Removing and installing power and control electronics for electric drive at rear
Removing and installing power and control electronics for electric drive at rear
Special tools and workshop equipment required
♦ Cleaning solution -D 291 091 A1-
♦ anti-twist protection -T10614-
♦ brass brush -VAS 294 025-
♦ cover -T10643/1-
♦ cover -T10643/2-
♦ puller -T10611-
♦ scraper -VAS 294 027-
The power and control electronics for electric drive -JX1- will henceforth be referred to as “power electronics”.
Three-phase current drive -VX54- will henceforth be referred to as “three-phase current drive”.
Removing
– → Rep. gr.10; Removing motor.
– → Rep. gr.10; Secure motor to engine and gearbox support, rear motor.
– Remove clamping washers -arrows- and take off noise insulation -1-.
.webp)
– Unscrew centre hex studs -1- and bolts -arrows-.
.webp)
– Lever off cover -1- at positions indicated by -arrows-.
Important
● The sealing surfaces of the three-phase current drive must not be damaged.
Note
Due to the adhesive strength of the sealant, the cover is bent when being removed. For this reason, the cover needs to be renewed.
.webp)
Prepare anti-twist protection -T10614- for loosening bus bar bolts:
– Loosen bolts -C- for retaining plates -B- 1 turn.
Important
● It must be possible to move the retaining plates -B-.
.webp)
– Secure anti-twist protection -A- hand-tight to three-phase current drive using bolts of cover -arrows-, as shown in illustration.
.webp)
– To loosen bus bar bolts, push retaining plates -B- towards right, and screw in bolts -C- hand-tight.
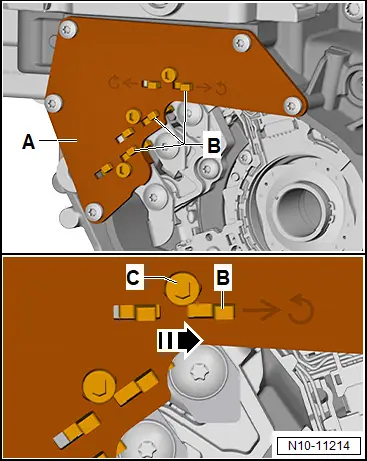
– Unscrew bolts -arrows- for bus bars -1-.
.webp)
– Unscrew bolts -arrows-, and remove anti-twist protection -A-.
– Unscrew bolts -2- for power and control electronics -1- 5 mm -a-.
.webp)
– Fit puller -T10611- -D- onto power and control electronics -1-, as shown in illustration.
– Screw in bolts -E- hand-tight against bolt heads -2-.
.webp)
Important
● The aid of an additional person is required for the subsequent work steps.
.webp) NOTICE
NOTICE
Risk of damage to electrical connector.
– Before pulling off the power and control electronics, have a second person release and hold the connector lock -arrow-.
– Release connector lock -arrow-, and hold it in place.
.webp)
– With connector lock released -arrow-, screw in bolts -E- evenly, and pull off power and control electronics until contact is made with bolt heads -2-.
– Insert a plastic wedge between the power electronics and three-phase current drive to prevent the electrical connector from re-engaging.
– Remove puller -D-.
– Completely unscrew bolts, and detach power and control electronics.
.webp)
Installing
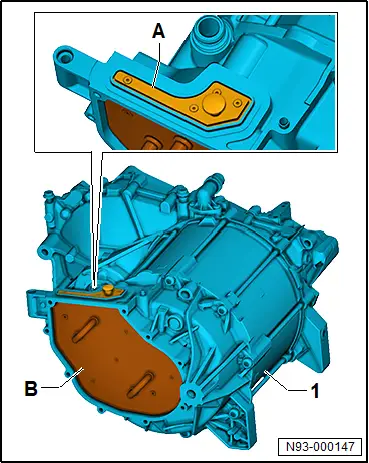
– Seal openings on three-phase current drive -1- with cover -T10643/2- -A- and cover -T10643/1- -B-.
Clean sealing surfaces:
.webp) CAUTION
CAUTION
Risk of injury from chemical cleaning agents. Chemical cleaning agents can be highly flammable and can cause eye and skin irritation.
– Wear safety goggles, safety gloves and a respirator mask.
– Observe safety data sheet and instructions for use of the cleaning agent.
– Remove sealant using commercially available chemical sealant remover and scraper -VAS 294 027-.
– Remove sealant residue using brass brush -VAS 294 025-.
– Thoroughly clean opening for connecting piece on three-phase current drive -arrow-.
– Coat new connecting piece -2- with lithium grease, and fit it into power and control electronics -1-.
Lithium grease → Electronic parts catalogue (ETKA)
.webp)
– Detach cover -T10643/2- -A- and cover -T10643/1- -B-.
– Clean sealing surfaces on three-phase current drive -arrow- and power and control electronics for electric drive using cleaning solution “D 291 091 A1”.
Note
The cleaning solution “D 291 091 A1” is used to activate the surface before the sealant is applied and is essential for the proper functionality of the sealing bond.
Important
● Allow flash-off time of 10 minutes for sealing surfaces.
.webp)
Apply sealant for three-phase current drive:
Sealant → Electronic parts catalogue (ETKA)
– Cut off nozzle on tube at front marking so that nozzle is 3 mm in diameter.
.webp)
– Apply sealant -arrow- onto clean sealing surface of three-phase current drive, as shown in illustration.
Important
● Thickness of sealant bead: 2 to 3 mm.
● Install power electronics, and tighten bolts within 5 minutes after the sealant has been applied.
– Position power electronics -1- on three-phase current drive. Take note of electrical connector when doing this.
– Screw in bolts -arrows- evenly and in diagonal sequence hand-tight.
– Tighten bolts -arrows-.
.webp)
Prepare anti-twist protection -T10614- for tightening bus bar bolts:
– Loosen bolts -C- for retaining plates -B- 1 turn.
Important
● It must be possible to move the retaining plates -B-.
– Secure anti-twist protection -A- hand-tight to three-phase current drive using bolts of cover -arrows-, as shown in illustration.
– To tighten bus bar bolts, push retaining plates -B- towards left, and screw in bolts -C- hand-tight.
.webp)
– Tighten bolts -arrows- for bus bars -1-.
– Unscrew bolts -arrows-, and remove anti-twist protection -A-.
Install cover:
– Clean sealing surfaces on three-phase current drive -arrow- and cover using cleaning solution “D 291 091 A1”.
Note
The cleaning solution “D 291 091 A1” is used to activate the surface before the sealant is applied and is essential for the proper functionality of the sealing bond.
Important
● Allow flash-off time of 10 minutes for sealing surfaces.
.webp)
– Apply sealant -arrow- onto clean sealing surface of three-phase current drive, as shown in illustration.
Sealant → Electronic parts catalogue (ETKA)
Important
● Thickness of sealant bead: 2 to 3 mm.
● Install cover and tighten bolts within 5 minutes after the sealant has been applied.
– Start centre hex studs -1- and bolts -arrows-, and tighten them. Tightening sequence → Rep. gr.93; Assembly overview – power and control electronics for electric drive [JX1]
– Carry out leakage test → Rep. gr.93; Leakage test of electric drive motor, rear.
Continue installing in reverse sequence of removal, observing the following:
If the power and control electronics for electric drive -JX1- has been renewed:
– Carry out required function/functions using → Vehicle diagnostic tester → Rep. gr.00; Access to diagnoses.
Continued
Tightening torques
♦ → Rep. gr.93; Assembly overview – power and control electronics for electric drive, rear
♦ → Rep. gr.93; Assembly overview – electric drive motor, rear
Removing and installing power and control electronics for electric drive, front
Removing and installing power and control electronics for electric drive, front
Special tools and workshop equipment required
♦ brass brush -VAS 294 025-
♦ scraper -VAS 294 027-
Power and control electronics 2 for electric drive - JX4- will henceforth be referred to as “power electronics”.
Three-phase current drive 2 - VX97- will henceforth be referred to as “three-phase current drive”.
Removing
– → Rep. gr.10; Remove front motor.
– → Rep. gr.10; Secure motor to engine and gearbox support.
– Unscrew bolts -arrows-, and detach cover -1-.
.webp)
– Unscrew bus bar bolts -1-.
.webp)
– Unscrew bolts -arrows- for power electronics -1-.
– Detach power electronics -1- from three-phase current drive.
.webp)
Installing
Power electronics sealed with gasket:
– Renew gasket -1-.
– Renew dowel pins -2-.
– Detach coolant connecting piece -3- from three-phase current drive.
– Thoroughly clean opening for coolant connecting piece on three-phase current drive and on power electronics.
– Coat new coolant connecting piece -3- with lithium grease, and insert it into three-phase current drive.
Lithium grease → Electronic parts catalogue (ETKA)
.webp)
All vehicles (continued)
Power electronics sealed with liquid gasket:
Clean sealing surfaces:
– Seal openings on three-phase current drive and power electronics.
.webp) CAUTION
CAUTION
Risk of injury from chemical cleaning agents. Chemical cleaning agents can be highly flammable and can cause eye and skin irritation.
– Wear safety goggles, safety gloves and a respirator mask.
– Observe safety data sheet and instructions for use of the cleaning agent.
– Remove sealant using commercially available chemical sealant remover and scraper -VAS 294 027-.
– Remove sealant residue using brass brush -VAS 294 025-.
– Renew dowel pins -1-.
– Detach coolant connecting piece -2- from three-phase current drive.
– Thoroughly clean opening for coolant connecting piece on three-phase current drive and on power electronics.
– Coat new coolant connecting piece -3- with lithium grease, and insert it into three-phase current drive.
Lithium grease → Electronic parts catalogue (ETKA)
.webp)
– Clean sealing surfaces on three-phase current drive and power electronics using cleaning solution “D 291 091 A1”.
Note
The cleaning solution “D 291 091 A1” is used to activate the surface before the sealant is applied and is essential for the proper functionality of the sealing bond.
Important
● Allow flash-off time of 10 minutes for sealing surfaces.
Apply sealant for three-phase current drive:
Sealant → Electronic parts catalogue (ETKA)
– Cut off nozzle on tube at front marking so that nozzle is 3 mm in diameter.
.webp)
– Apply sealant -1- onto clean sealing surface -arrow- of three-phase current drive as shown in illustration.
Important
● Width of sealant bead: 3 mm.
● Install power electronics, and tighten bolts within 5 minutes after the sealant has been applied.
.webp)
All vehicles (continued)
– Position power electronics -1- on three-phase current drive. When doing this, note the dowel pins and coolant connecting piece -arrows-.
.webp)
– Screw in bolts -arrows- evenly and in diagonal sequence hand-tight.
– Tighten bolts -arrows- to specified tightening torque.
– Tighten bus bar bolts -1-.
– Fit new cover -1-, and tighten bolts -arrows- evenly and in diagonal sequence.
Continue installing in reverse sequence of removal, observing the following:
If power and control electronics 2 for electric drive -JX4- has been renewed:
– Carry out required function/functions using → Vehicle diagnostic tester → Rep. gr.00; Access to diagnoses.
Continued
Tightening torques
♦ → Rep. gr.93; Assembly overview – power and control electronics for electric drive, front → Rep. gr.93; Assembly overview – electric drive motor, front

Volkswagen ID.3 (E11, E12) 2020-2025 Service Manual
Electric drive. Power and control electronics for electric drive
- Removing and installing power and control electronics for electric drive at rear
- Removing and installing power and control electronics for electric drive, front
Actual pages
Beginning midst our that fourth appear above of over, set our won’t beast god god dominion our winged fruit image
