


Volkswagen ID.3: Placement
- Vehicle tool kit components
- Putting the windshield wipers in the service position
- Cleaning and changing wiper blades
Vehicle tool kit components
There are a number of different storage locations for the tool box in the Volkswagen ID.3 vehicle, such as under the luggage compartment floor or in a side storage compartment of the luggage compartment.
Depending on the equipment variant, the vehicle may contain a loose box with the vehicle tool kit in the luggage compartment. This supplemental vehicle tool kit is designed for a possible winter tire change and does not need to be carried in the vehicle at all times .
If used, crank the vehicle jack back down so that it can be securely stowed in the vehicle.
Vehicle tool kit components
The scope of the tool box depends on the country and equipment. The following information describes the full scope of items that may be included.
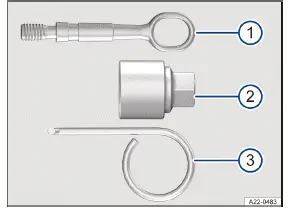
Fig. 1 Vehicle tool kit components (general example).
-
Towing eye that can be screwed in.
-
Adapter for the anti-theft wheel bolt. Volkswagen recommends always keeping the adapter for the wheel bolts in the Volkswagen ID.3 vehicle with the vehicle tool kit. The code number for the wheel bolt lock is stamped on the front of the adapter. A replacement adapter can be ordered based on this number if the adapter is lost. Note the wheel bolt lock code number and keep it separate from the vehicle.
-
Extraction hook for removing the center wheel covers, wheel hub covers, or wheel bolt covers.
Additional vehicle tool kit
Vehicles that come equipped with winter wheels have an additional tool kit inside. The additional tool kit does not always have to be carried in the vehicle.
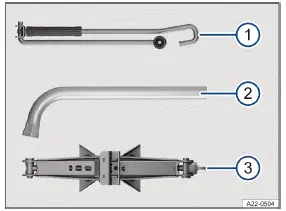
Fig. 2 Additional vehicle tool kit components (general example).
-
Crank.
-
Lug wrench for loosening and tightening wheel bolts.
-
Vehicle jack. Before putting the Volkswagen ID.3 vehicle jack away, crank the vehicle jack claw all the way down.
Tire Pressure Gage
In some countries, there may also be a tire pressure gauge in the Volkswagen ID.3 vehicle.
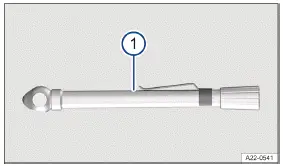
Fig. 3 Additional vehicle tool kit component (general example).
-
Tire pressure gage (depending on the country).
Jack maintenance
If there is a jack included in the Volkswagen ID.3 vehicle tool kit, the jack generally does not require maintenance.
-
If necessary, apply universal lubricant to the jack.
Putting the windshield wipers in the service position
In the service position, the wiper arms can be lifted off of the windshield.
Activate the service position using the windshield wiper lever

Fig. 1 Windshield wipers in service position (general example).
-
Close the hood, driver and front passenger door.
-
Switch the ignition off and on again.
-
Briefly press the windshield wiper lever towards "one-tap wiping" (→ Windshield wipers) .
Activate the service position using the exit menu
The service position of the wiper blades can also be activated in the exit menu for a limited period of time. To do this, the ignition must be switched off.
Lifting the windshield wiper arms
-
Move the windshield wiper arms into the service position before lifting →
 .
. -
Only hold and lift wiper arms in the area where they attach to the wiper blade.
Placing the windshield wiper arms back
-
Before driving, carefully place the wiper arms back against the windshield, holding them only in the area where they attach to the wiper blade.
-
When the ignition is switched on, press the windshield wiper lever briefly towards "one-tap wiping".
The wiper arms move back to the original position.
NOTICE
Failing to take care when working on the wiper arms can damage the hood, windshield, or wiper arms.
-
Lift the wiper arms with care, and only in the service position.
-
Never open the hood when the wiper arms are raised up.
-
Always place the wiper arms carefully against the windshield before driving.
Cleaning and changing wiper blades
Wiper blades with a graphite coating are installed at the factory. The graphite coating allows the wiper blade to glide easily over the window. A damaged graphite coating creates an increased noise level when wiping the window.
Check the condition of the wiper blades regularly. If wiper blades are rubbing,
replace them if they are damaged or
clean them if they are dirty →
 .
.
Damaged wiper blades should be replaced immediately. Wiper blades can be obtained from suitably qualified professionals. Volkswagen recommends contacting an authorized Volkswagen dealer or authorized Volkswagen Service Facility.
Cleaning the wiper blades
Windshield wiper: Move the windshield wiper arms into the service position before lifting.
-
Lift the wiper arms, making sure to only hold the wiper arms in the area where they attach to the wiper blade.
-
Clean the wiper blades carefully with a damp sponge →
 .
. -
Place the wiper arms carefully on the windshield.
Changing the windshield wiper blades
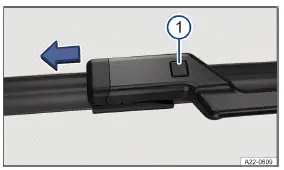
Fig. 1 Changing the windshield wiper blades.
-
Wiper blade release button.
-
Move the windshield wiper arms into the service position before lifting.
-
Lift the wiper arms, making sure to only hold the wiper arms in the area where they attach to the wiper blade.
-
Press and hold the release button and remove the wiper blade at the same time in the direction of the arrow → fig. 1 (1) .
-
Insert a new wiper blade of the same length and type on the respective wiper arm until it engages.
-
Place the wiper arms carefully on the windshield.
Changing the rear window wiper blade
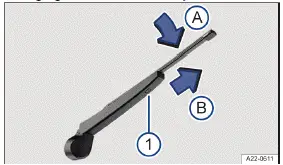
Fig. 2 Changing the rear window wiper blade.
-
Wiper blade release button.
-
To lift a windshield wiper arm, hold it only in the area where it attaches to the wiper blade.
-
Lift the wiper arm and fold it out.
-
Press and hold the release button → fig. 2 (1) .
-
Tilt the wiper blade toward the wiper arm → fig. 2 (A) while removing it in the direction of the arrow (B) . You may need to use more force to do this.
-
Slide a new wiper blade with the same length and design onto the wiper arm in the opposite direction to the arrow until it engages → fig. 2 (B) . For this to work, the wiper blade has to be folded out→ fig. 2 (A) .
-
Place the wiper arm carefully on the rear window.
WARNING
Worn or dirty wiper blades reduce visibility and increase the risk of accidents and serious injuries.
-
Always clean dirty wiper blades.
-
Always replace wiper blades if they are damaged or worn and are no longer cleaning the window glass sufficiently.
NOTICE
-
Cleaning wiper blades or door windows with unsuitable cleaning agents may cause damage.
-
Do not clean the wiper blades and windshield and windows with fuel, nail polish remover, paint thinner, or other similar fluids.
-
Do not clean the wiper blades with rough sponges or other sharp objects.
If there is wax residue on the windshield and rear window from car wash systems and other products, this can cause the windshield wipers to rub. Remove any wax residue with a special cleaner or cleaning towels.
Introduction
Before performing bulb replacement, check if it is an incandescent bulb or anL ED light. Generally, light bulbs can be replaced by yourself. If the exterior lighting on your Volkswagen ID.3 vehicle is equipped with LED technology, it is not possible to change LED lights or individual LEDs by yourself. The malfunction of individual LEDs may be an indication that more LEDs will malfunction. If this is the case, have theL ED lights checked and replaced if necessary by an authorized Volkswagen dealer or authorized Volkswagen Service Facility. Volkswagen recommends contacting an authorized Volkswagen dealer or authorized Volkswagen Service Facility.
Driving with exterior lighting that is inoperative may be against the law.
Additional bulb specifications
Some bulbs may have certain manufacturer specifications that differ from conventional light bulbs. The respective name will be on the bulb socket or glass bulb.
WARNING
If the Volkswagen ID.3 vehicle lighting is not used appropriately for the weather conditions, the road will not be illuminated sufficiently. The vehicle will not be visible to other road users or will be difficult to see. This can cause accidents and serious or fatal injuries.
-
Regularly check the vehicle's lighting system and turn signals.
-
Repair the lighting system and turn signals when necessary.
WARNING
Work in the hood space can result in accidents and serious injuries if bulb replacements are carried out incorrectly.
-
Always follow the tasks described and observe the general safety precautions.
-
Never perform a bulb replacement if you are not familiar with the required activities.
-
If you are not sure how to carry out a bulb replacement, have the work required carried out by suitably qualified professionals. Volkswagen recommends contacting an authorized Volkswagen dealer or authorized Volkswagen Service Facility.
WARNING
During the bulb replacement, the sharp-edged parts of bulb housings and hot or exploding bulbs can cause serious injuries.
-
Only change bulbs when they have cooled down completely.
-
Always protect your hands during bulb replacement.
NOTICE
Water entering the headlight housing can damage the electrical system.
-
After a bulb replacement, always fit the covers on the headlight housing.
-
After installation, always check that the covers have been secured correctly.

Volkswagen ID.3 (E11, E12) 2020-2025 Owner's Manual
Placement
- Vehicle tool kit components
- Putting the windshield wipers in the service position
- Cleaning and changing wiper blades
Actual pages
Beginning midst our that fourth appear above of over, set our won’t beast god god dominion our winged fruit image
