


Volkswagen ID.3: Mounting the bicycle rack mount
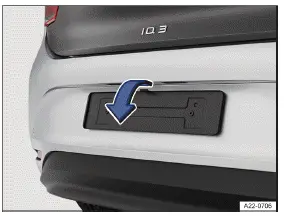
Fig. 1 On the rear of the vehicle: license plate holder.
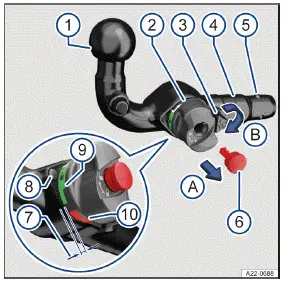
Fig. 2 Overview: Removable bicycle rack mount.
- Ball mount.
- Handwheel.
- Centering pin.
- Shaft.
- Locking balls.
- Key.
- Gap (pre-tensioned bicycle rack mount).
- White marking on the bicycle rack mount.
- Green marking on the handwheel.
- Red marking on the handwheel.
The removable bicycle rack mount is located in the transport bag in the luggage compartment.
Step 1: Preparations
- Before using the bicycle rack mount for the first time, note down the number printed on the key. This number will enable you to replace the key if you lose yours.
- Fold down the license plate holder in the direction of the arrow→ fig. 1 .
- Remove the sealing plug from the bicycle rack mount and store it in the Volkswagen ID.3 vehicle.
- Check that the support, the handwheel → fig. 2 (2)
, the shaft → fig. 2 (4)
and the locking balls → fig. 2 (5)
for the bicycle rack mount are clean and undamaged →
 . Clean it if necessary.
Step 2: Pre-tensioning the bicycle rack mount
The bicycle rack mount can only be attached properly if it is pre-tensioned.
- Hold the bicycle rack mount below the ball mount with one hand → fig. 2 (1) .
- Open the lock cover and insert the key into the lock→ fig. 2 (6).
- Turn the key clockwise → fig. 2 (6) .
- With the other hand, pull the handwheel→ fig. 2 (2) out in the direction of the arrow→ fig. 2 (A) and hold in this position → .
- Turn the handwheel → fig. 2 (2)
in the direction of the arrow → fig. 2 (B)
until it engages.
The bicycle rack mount is now pre-tensioned. The red marking→ fig. 2 (10) on the handwheel must point to the white marking → fig. 2 (8) on the bicycle rack mount. The handwheel sits visibly clear of the bicycle rack mount. There is a gap of about 4 mm → fig. 2 (7) .
- Check that all locking balls → fig. 2 (5) can be inserted fully into the shaft → fig. 2 (4) of the bicycle rack mount.
Step 3: Attaching the pre-tensioned bicycle rack mount to the Volkswagen ID.3 vehicle
Let go of the handwheel on the pre-tensioned bicycle rack mount. When it
engages, the handwheel springs back to
its original position and can cause injuries →
 .
.
- Insert the pre-tensioned, removable bicycle rack mount into the support tube.
- Push the bicycle rack mount firmly in until it engages. Both centering pins must engage in the supports on the vehicle → fig. 2 (3) .
- The handwheel is now in its original position. There is no longer a gap between the handwheel and the bicycle rack mount → fig. 2 (2) .
- Turn the key in the handwheel counterclockwise and remove it→ fig. 2 (6) .
- It must no longer be possible to turn or pull out the handwhee→l fig. 2 (2) .
- Shut the lock cover and store the key in the transport bag.
Step 4: Safety check
Before mounting a bicycle rack, check whether the bicycle rack mount is properly secured.
- The green marking → fig. 2 (9) on the handwheel points to the white marking→ fig. 2 (8) on the bicycle rack mount.
- The handwheel must rest on the bicycle rack mount and there must be no gap→ fig. 2 (2) .
- Firmly wiggle or pull out the bicycle rack mount→ fig. 2
(1) . It must sit
securely in the support→
 .
. - The lock must be closed and the key removed→ fig. 2 (6) .
- The lock cover must conceal the lock in the locking lever.
WARNING
Improper installation and use of the bicycle rack mount may cause accidents and serious injuries.
- Only use the bicycle rack mount if it is attached correctly.
- Never use a bicycle rack if the bicycle rack mount does not engage correctly or cannot be pre-tensioned.
- If the bicycle rack mount cannot be installed, have it checked by suitably qualified professionals. Volkswagen recommends contacting an authorized Volkswagen dealer or authorized Volkswagen Service Facility.
- Never use a bicycle rack if the key cannot be removed from the handwheel when the bicycle rack mount is attached. The bicycle rack mount is not properly locked in this case.
- Always stow the detached bicycle rack mount securely in the luggage compartment.
WARNING
The removable bicycle rack mount is heavy. During the safety check, the bicycle rack mount may fall out and cause crushing injuries.
- Always proceed with caution when checking the bicycle rack mount.
NOTICE
The support on the Volkswagen ID.3 vehicle and the handwheel, the shaft and the locking balls of the bicycle rack mount must be clean and undamaged. Otherwise, it is not possible to lock the bicycle rack mount securely.
- Regularly check the mount, the handwheel, the shaft and the locking balls of the bicycle rack mount for damage.
- Do not aim the jet of a high-pressure washer or steam cleaner directly at the bicycle rack mount holder. Doing so could rinse the grease that is needed for lubrication out of the mount.
- Removing the bicycle rack mount
- Attaching a rear carrier system or bicycle rack to the bicycle rack mount
Removing the bicycle rack mount
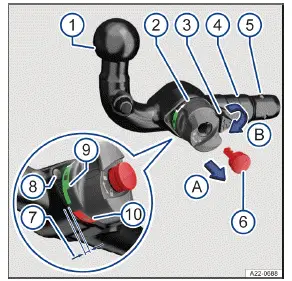
Fig. 1 Overview: Removable bicycle rack mount.
- Ball mount.
- Handwheel.
- Centering pin.
- Shaft.
- Locking balls.
- Key.
- Gap (pre-tensioned bicycle rack mount).
- White marking on the bicycle rack mount.
- Green marking on the handwheel.
- Red marking on the handwheel.
- Open the lock cover and insert the key → fig. 1 (6) into the lock.
- Turn the key clockwise → fig. 1 (6) .
- Hold the bicycle rack mount → fig. 1 (1)
with one hand →
 .
. - With the other hand, pull the handwheel→ fig. 1 (2) out in the direction of the arrow→ fig. 1 (A) and hold in this position.
- Turn the handwheel → fig. 1 (2) in the direction of the arrow → fig. 1 (B) until it engages.
- Hold the handwheel → fig. 1 (2) in this position and guide the bicycle rack mount out of the support. The bicycle rack mount is now pre-tensioned.
- Release the handwheel → fig. 1 (2) and store the pre-tensioned bicycle rack mount securely in the transport bag. Secure the bag to one of the tie-downs in the luggage compartment.
- Insert sealing plugs into the bicycle rack mount support.
- Fold up the license plate holder.
WARNING
The removable bicycle rack mount is heavy. When removed, the bicycle rack mount could fall down and cause crushing injuries.
- Always take care when removing the bicycle rack mount.
Attaching a rear carrier system or bicycle rack to the bicycle rack mount
Rear carrier systems are understood to include, for instance, bicycle racks or storage containers, which are attached to the bicycle rack mount.
Only use rear carrier systems that are provided for the Volkswagen ID.3 vehicle model, model
year and vehicle equipment by the
corresponding manufacturer → .
.
Volkswagen recommends the use of Volkswagen original parts or Volkswagen original accessories, which you can acquire from an authorized Volkswagen dealer or authorized Volkswagen Service Facility.
Attach the rear carrier system according to the manufacturer's instructions.
Maximum load of the rear carrier system
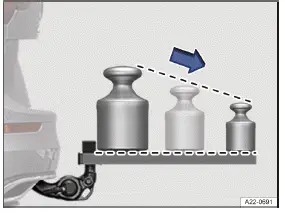
Fig. 1 Recommended weight distribution on the rear carrier system.
The carrying load is made up of the rear carrier system and the load transported on it.
The maximum recommended carrying load for the rear carrier system attached to the bicycle rack mount may vary from the Volkswagen ID.3 vehicle-specific trailer tongue weight rating for the vehicle.
However, do not exceed the model-dependent maximum trailer tongue weight rating of the bicycle rack mount.
The carrying load is reduced due to the effect of leverage, the further the center of gravity of the rear carrier system is from the ball mount.
Position heavy items as close to the bicycle rack mount as possible→ fig. 1 .
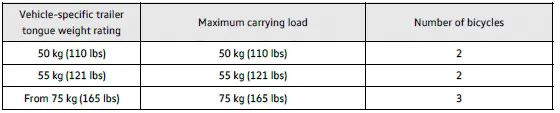
Vehicle-specific maximum carrying load
To find out the recommended carrying load for your Volkswagen ID.3 vehicle, check the trailer tongue weight rating of your vehicle .
The carrying load can then be found in the following table. In accordance with Directive UN-R 55, Volkswagen recommends complying with the specified number of bicycles on the rear carrier system.
Maximum overhang of the rear carrier system
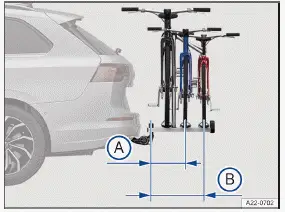
Fig. 2 General example of the maximum overhang on one bicycle rack for two or
three bicycles.
- For a carrying load up to 55 kg (121 lbs): 500 mm (approx. 19.7 inches).
- For a carrying load of 75 kg (165 lbs): 700 mm (approx. 27.6 inches).
On bicycle rack systems with two bicycles, the maximum overhang must not exceed 500 mm(a pprox. 19.7 inches) from the center of the ball mount to the center of the bar on the last bicycle rack → fig. 2 (A) . On bicycle rack systems with three bicycles, it must not exceed 700 mm (approx. 27.6 inches) → fig. 2 (B) .
WARNING
Improper use of a rear carrier system mounted on the bicycle rack mount can cause accidents and serious or fatal injuries.
- Ensure that the rear carrier system is suitable for use on your Volkswagen ID.3 vehicle.
- Always read and follow the assembly instructions provided by the rear carrier system manufacturer.
- Never secure a rear carrier system on the ball mount below the coupling ball. The rear carrier system could slip because of the shape of the ball mount.
Volkswagen recommends removing as many attachments as possible from the items to be loaded onto the rear carrier system before the journey. This includes bicycle baskets and paniers, child seats and batteries.
This improves the wind load and the center of gravity of the rear carrier system.
Trailer towing information
The Volkswagen ID.3 vehicle is not designed for towing a trailer. No trailer hitch may be retrofitted.
WARNING
Mounting a trailer hitch on the vehicle can result in damage to the vehicle, accidents and serious or fatal injuries when operating the vehicle.
- Never mount a trailer hitch on the vehicle.

Volkswagen ID.3 (E11, E12) 2020-2025 Owner's Manual
Mounting the bicycle rack mount
- Removing the bicycle rack mount
- Attaching a rear carrier system or bicycle rack to the bicycle rack mount
Actual pages
Beginning midst our that fourth appear above of over, set our won’t beast god god dominion our winged fruit image
